Readers find it difficult to scroll through the lengthy content of a blog or scroll down to its important sections, due to which some visitors exit the page before reading it completely. In this blog post, we will know about adding the “TABLE OF CONTENTS” box in WordPress blog through which your website visitors can easily scroll through.
“Table of Contents” of blog post or page is an overview or structure in which all the titles of the post are displayed. It helps understand your audience what a particular page contains or how much it is useful to them. In addition, with the help of table of contents, visitors can directly jump to the section of their choice.
In “Table of Contents” you can show all headings H1, H2, H3, H4, H5, H6 as well as you can also set title limit. There are two main advantages of using the Table of Contents in a blog post.
- It becomes easy for the audience to read the content or scroll down to the important sections of the article.
- Helps reduce your website’s bounce rate.
- Increase search engine visibility of the site.
HOW TO ADD TABLE OF CONTENTS TO A WORDPRESS BLOG:
WordPress is the best and most popular platform for blogging. In WordPress, you can also use free plugins to add any feature to your website or blog. For this, you don’t need to make any additional changes or edits to display these features on your site.
There are two ways to use table of contents in a blog post:
1. You can add “Table of Contents” to website with the help of HTML, CSS or JavaScript. It requires to have knowledge of coding.
2. If you are a WordPress user, then you can use free WordPress plugins to add TOC in your blog post. You don’t need any extra knowledge to insert it into your website. With this, there will be an automatic TOC display in each of your blog post.
Here; we will use the second method by using a free WordPress plugin. You will find many plugins to add “Table of Contents” feature but I like “Table of Contents Plus” plugin the best among all.
HOW TO USE TABLE OF CONTENTS PLUS PLUGIN IN WORDPRESS:
“Table of Contents Plus” is a WordPress plugin, developed by Michael Tran, with 300,000+ active installations. It is absolutely free. Its setup is very easy and you only have to set up some basic steps.
DOWNLOAD AND INSTALL THE PLUGIN:
Go to your WordPress dashboard, then under “Plugins” option click on “Add New”. Now search for “Table of Contents Plus” in the search box. Here; you will see a plugin as shown in the image below.

Click on “Install Now” and then “Activate”.
SETUP OF TABLE OF CONTENTS PLUS PLUGIN:
After activating the plugin, you have to customize your settings. For this, go to WordPress Navigation Settings >> TOC+ options.
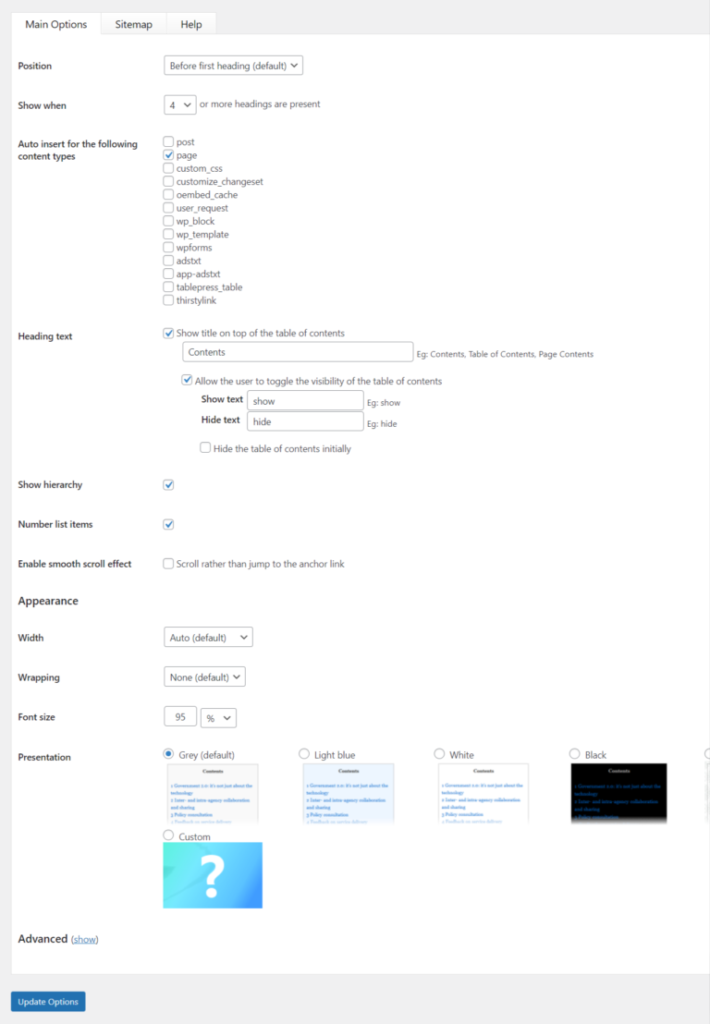
MAIN OPTIONS:
- Position: This feature allows you to set the position of the “Table of Contents” box. The default is the “before the first title” space. You can change it according to your convenience.
- Show When: Here; you can set how many headings to show the “Table of Content”.
- Auto insert for the following content types: Select the post or page where you want to show the TOC.
- Title text: This option enables you to show or hide “Table of Contents” title. You can also make the toggle the default Show Hide.
- Show Hierarchy: By enabling this option, you can show the title or subtitle in the structure stage.
- Number List Item: Ticking this option will show numeric next to the heading.
- Enable smooth scroll effect: When clicking on a table of contents title will make us jump to the direct section. Enable the option if you want to do it gradually with the “smooth scroll effect”.
APPEARANCE:
- Width: In this option, you can adjust the width of the enabled box.
- Wrapping: Can display left, right from table box.
- Font size: Here; you can increase or decrease the size of the text fonts.
- Presentation: Here; you can select the look of the table box. Select gray (default), light blue, white, black, transparent and custom as you like.
- Advanced: In advance settings, you can do advanced settings for the content, such as hiding a heading from the TOC, setting a top margin, CSS file, lowercase, and more.
- Update: Click “Update Options” to save settings.
Now; all posts on your site will automatically show “Table of Contents”. TOC will be automatically added in the every new post you write. Now you don’t need to do any extra setting.
TAKE AWAY
In this article, you have learned how to add table of contents in a WordPress blog. If you still have any question or suggestions, please leave in the comment section below.
And; don’t forget to share it with others!