If you’re going to start a business then a website can give more exposure to your newly business. In this situation, it is very necessary to have some basic knowledge about website basics. In this sequence, when it comes to a transparent logo design, it can be a very difficult task for you to make the background of your logo fully transparent.
But just take a chill pill.
In this article, we will teach you how to create a logo transparent STEP-BY-STEP. So, lets jump-in!!
How to Remove Background of Image using Remove BG:
This is one of the simplest way to remove background of any image you want to. For this, simply go to Remove BG.
Now, upload the image you want its background transparent and rest of the work Remove BG will handle itself.
It will make your image’s background transparent in just a few seconds!

So, give it a try guys!
How to Make a Transparent Logo using Photopea?
Just follow these 8 easy steps to make your logo transparent:
STEP 1. To make your logo transparent, first, go to your browser and open Photopea.

STEP 2. Go to Open (CTR+O) under the FILE option available in the left hand side.
Step 3. Now open your desired file or logo you want to make transparent.
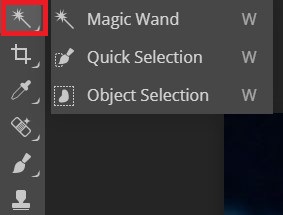
Step 4. Now in the left side of this website, an option of magic wand will be seen. Just make the right click under this option and choose the fist option “Magic Wand”.

STEP 5. After selecting this option, click on the image you have uploaded for a transparent background design.
STEP 6. Click on the uploaded picture and press DELETE. Click everywhere you want to make it transparent.
STEP 7. Go to File and select “EXPORT TO” option and then select “PNG” (you can also choose other options such as jpg).
STEP 8. Click SAVE button. Now its done and ready to download.

